
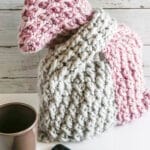
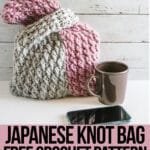
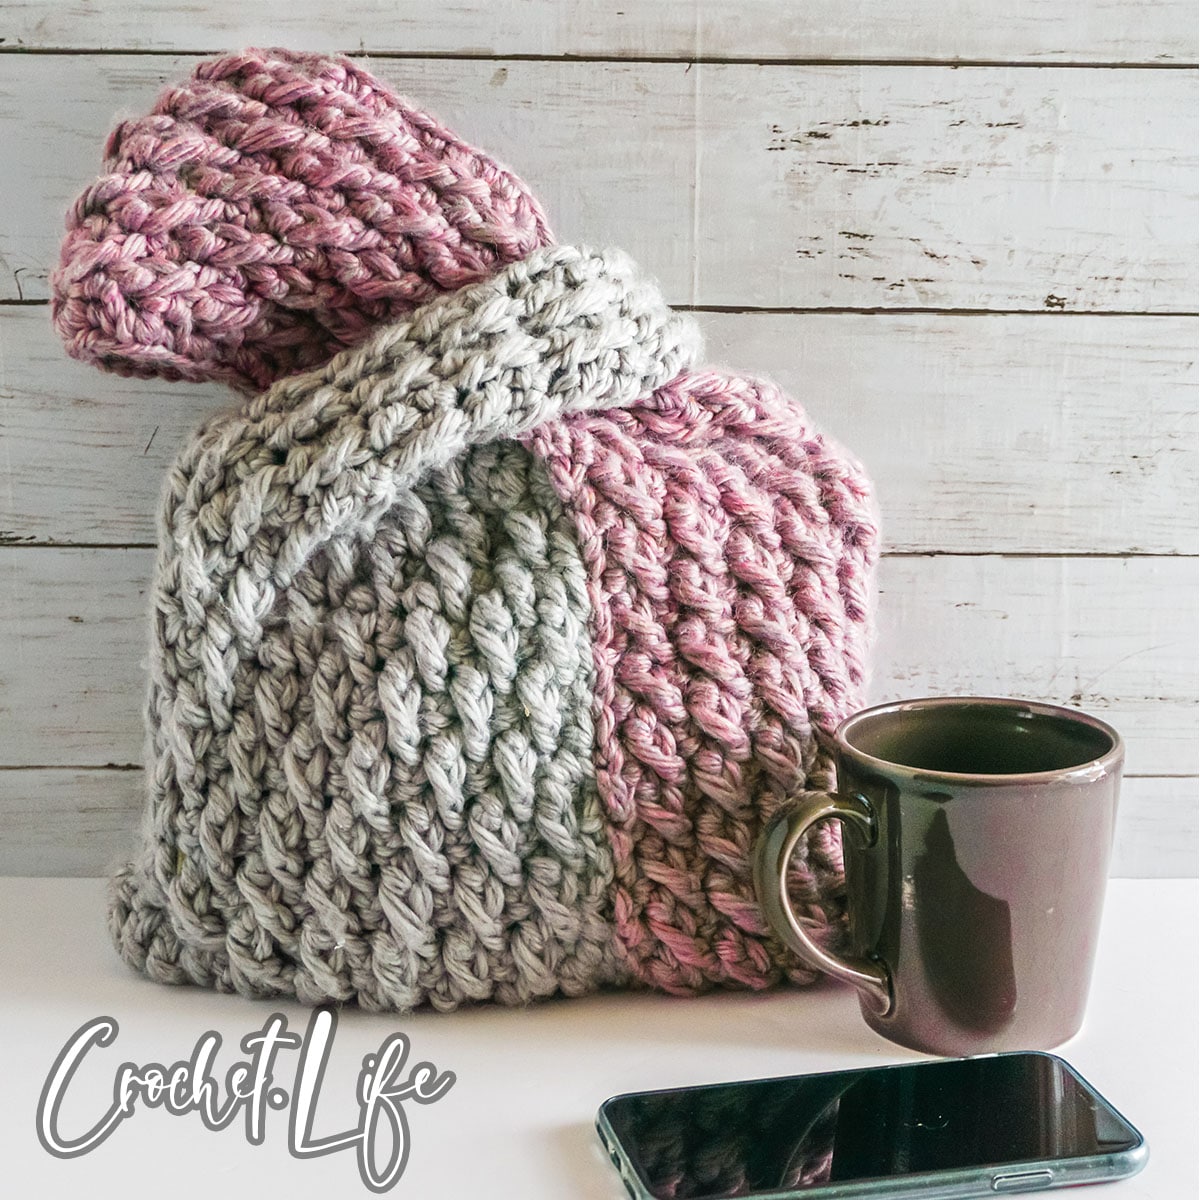
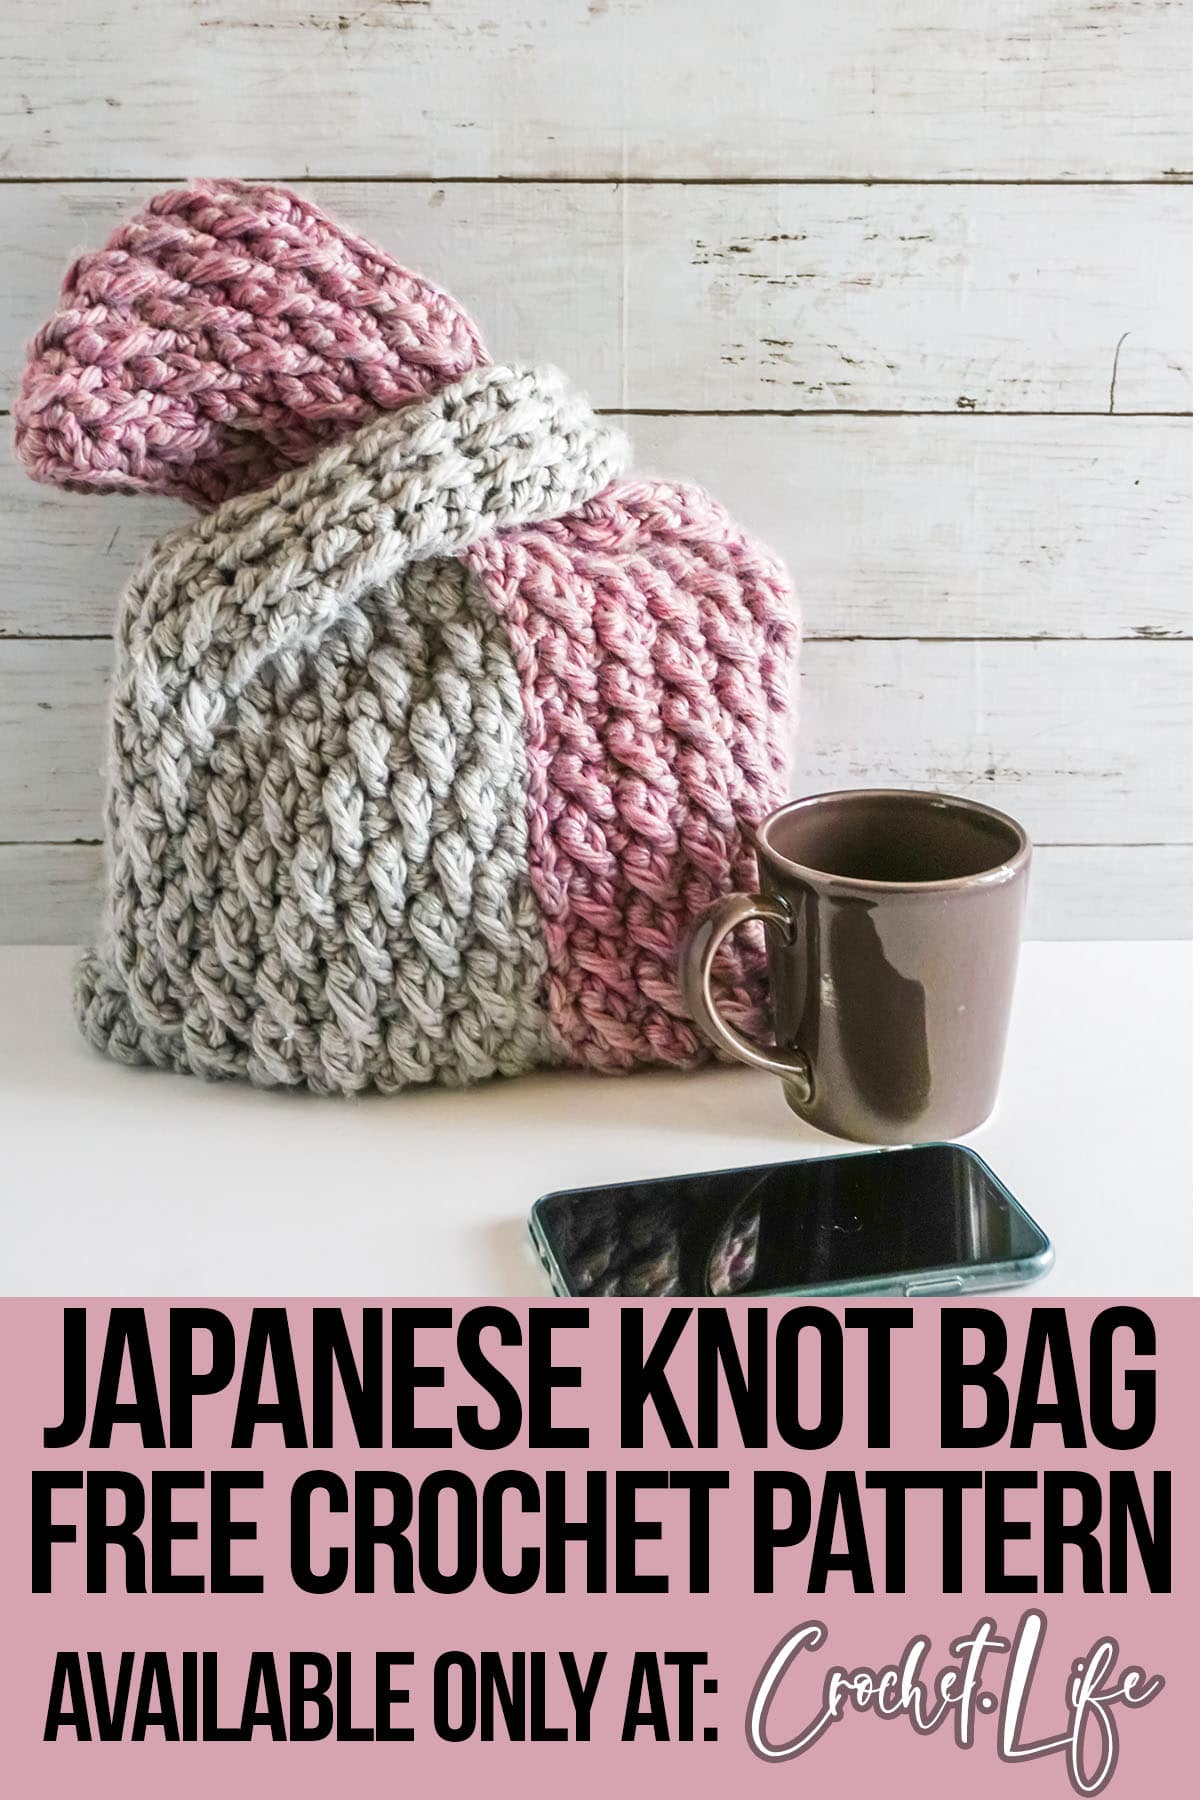
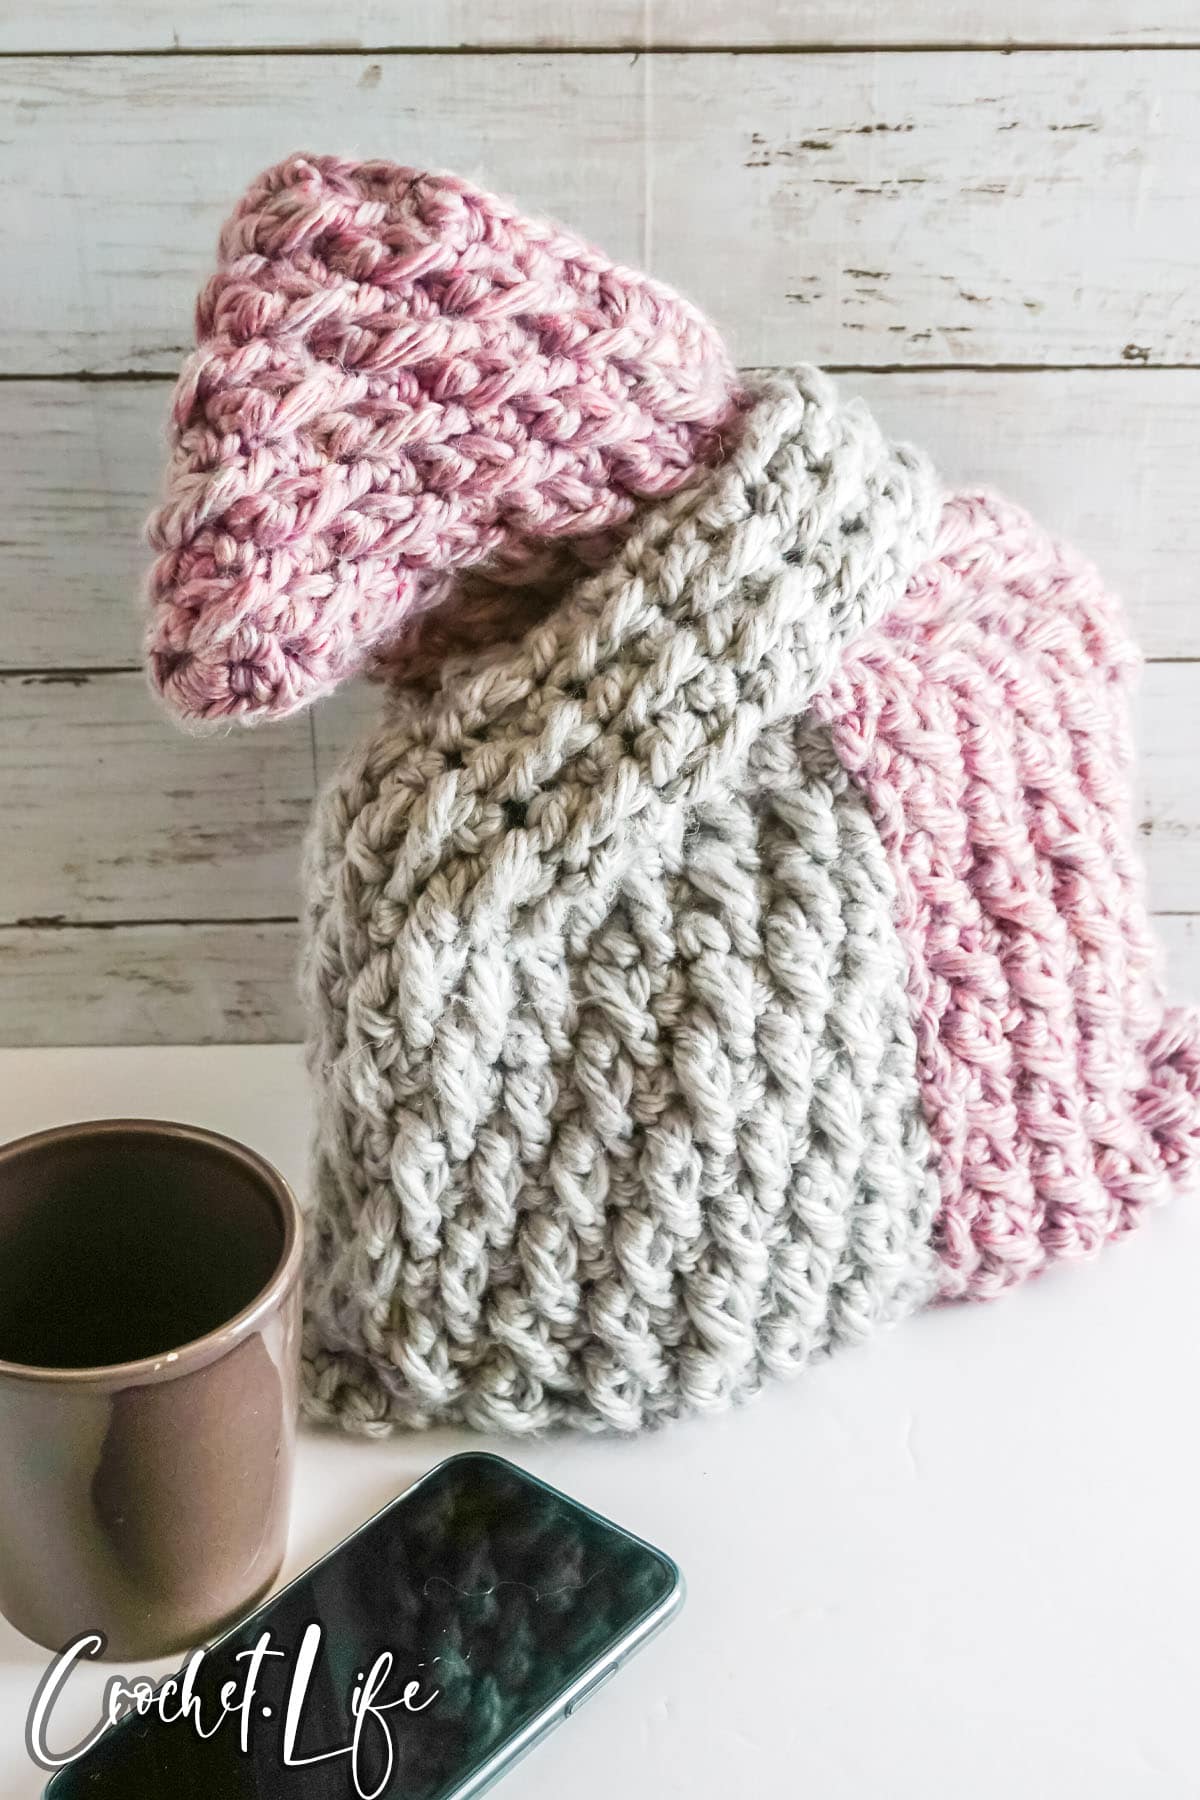
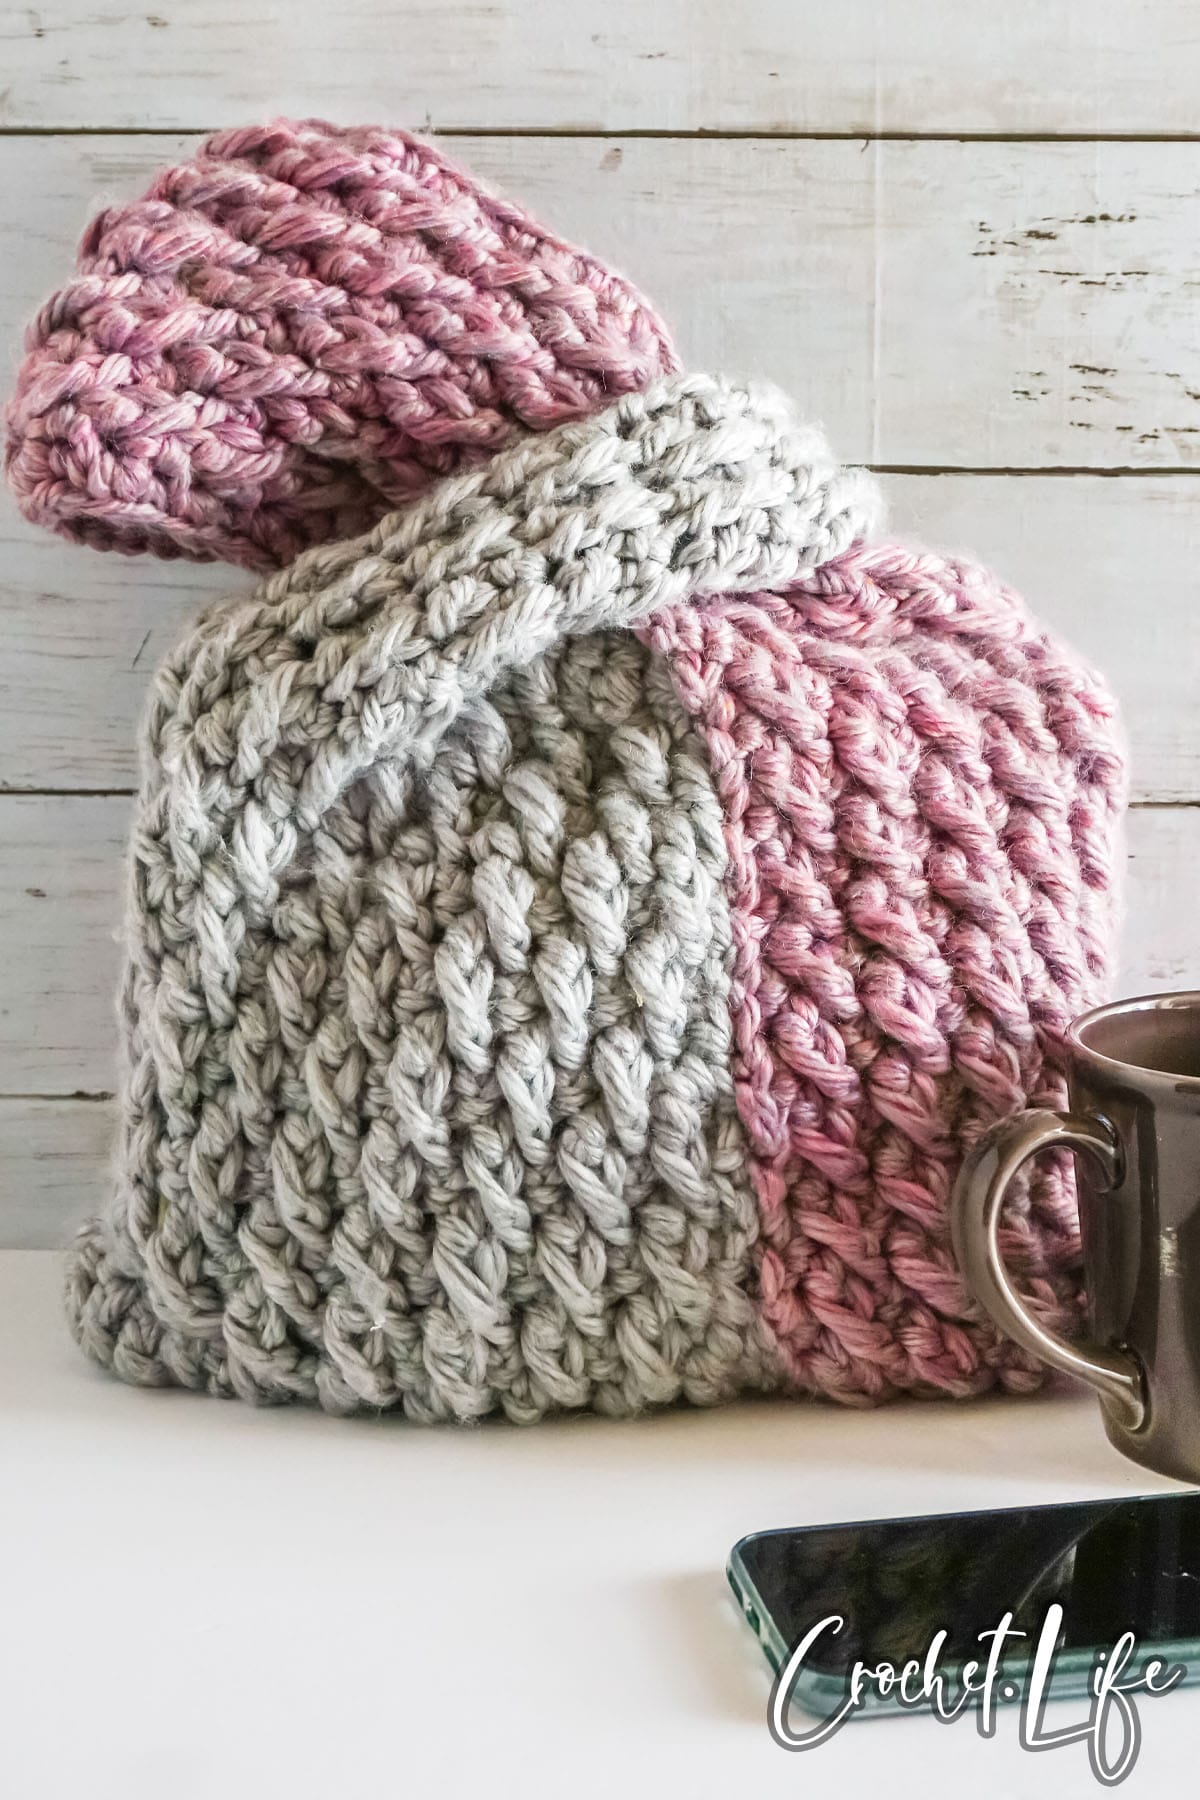
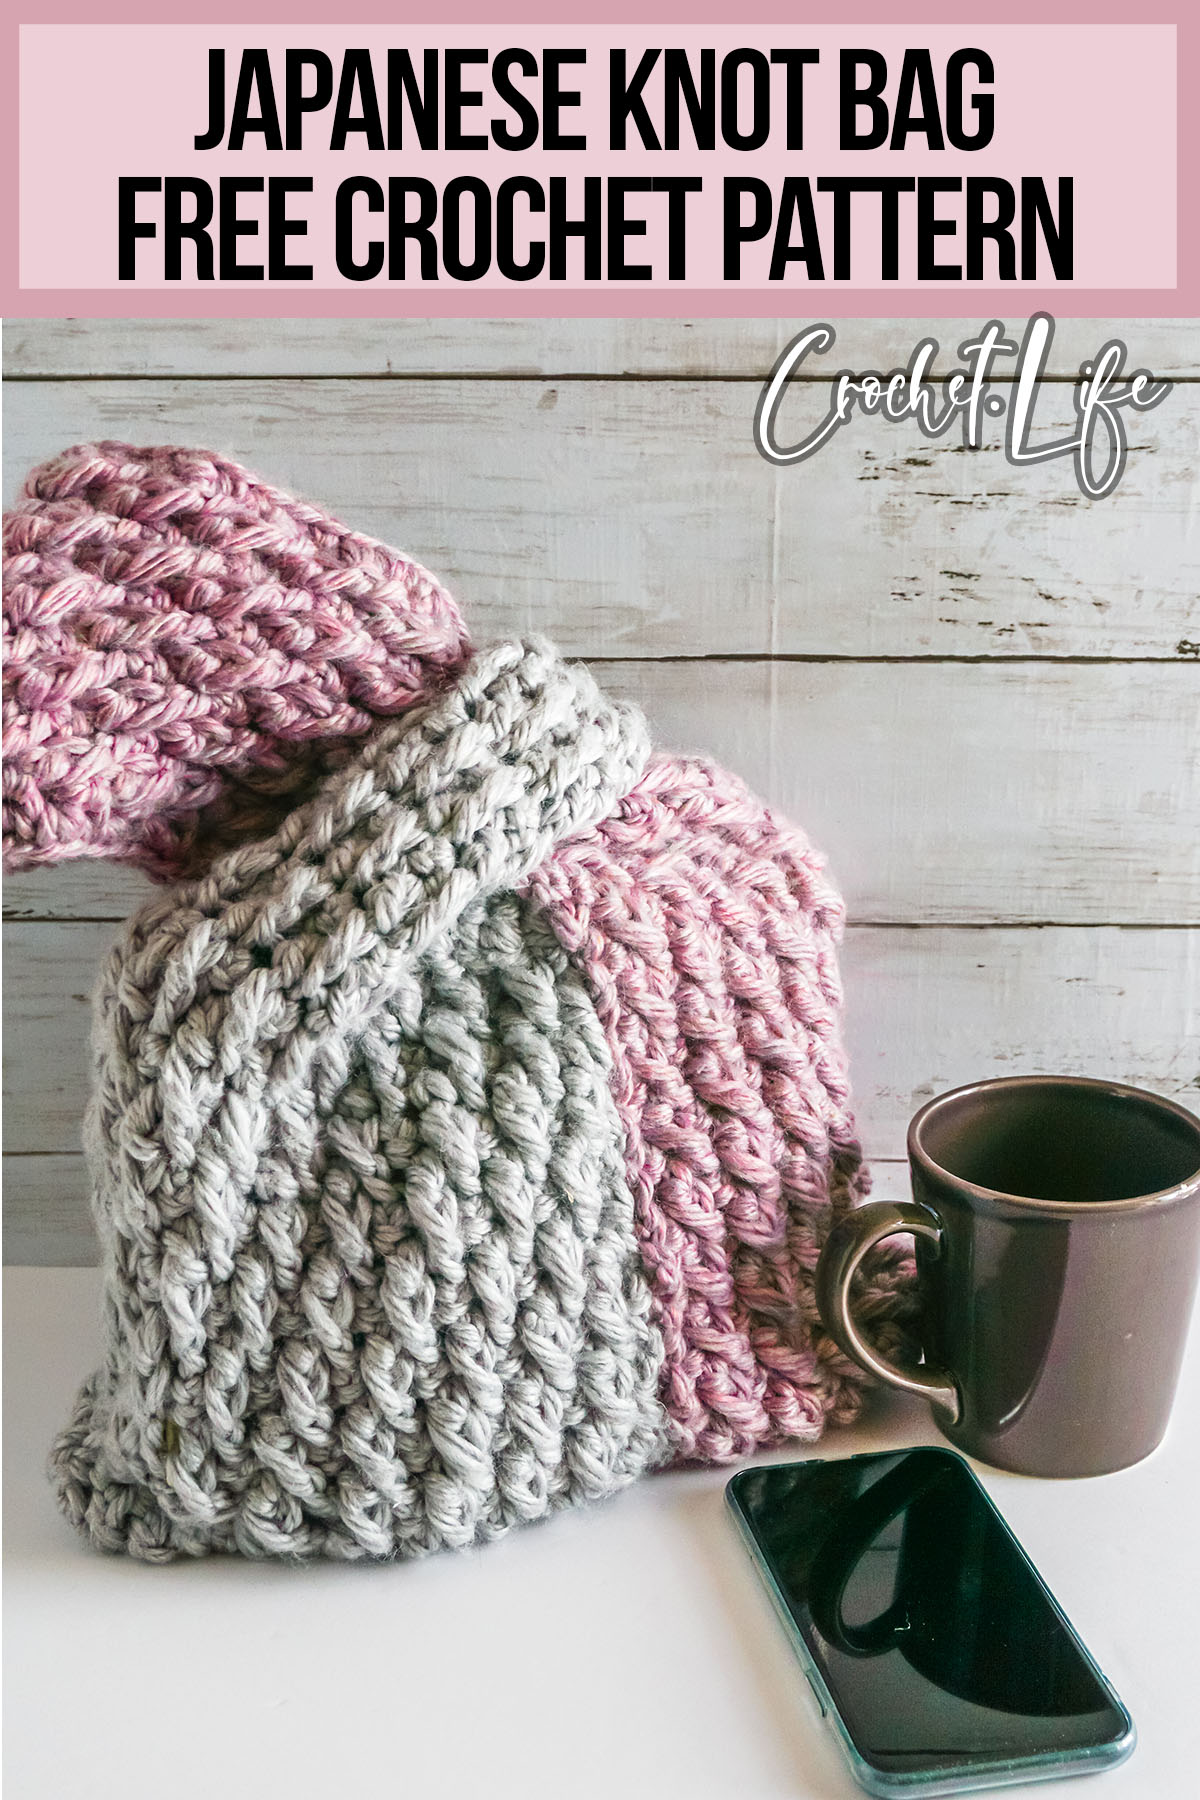
Sometimes, you just want to make something for yourself and you want it to be beautiful and fun. I wanted a new purse and this Japanese knot bag crochet pattern was the perfect free crochet pattern to make a fun and gorgeous gift for myself.
Japanese Knot Bag Crochet Pattern – Free Crochet Pattern
One thing I really love about crocheting wearables is creating texture that you don’t typically see in off-the-shelf products. It makes for a fun activity when you’re crocheting, but it also makes for a fun and unique finished product that really stands out.
I’d been wanting to make something for myself for a while – and the alpine stitch was calling my name with all that thick (thicc?! LOL!) texture, I knew that the idea of an alpine stitch purse could really be fun.
So, I grabbed one of my new favorite yarns (recycled from water bottles! so cool!) and got hooking!
What Yarn Should You Use for a Japanese Knot Purse?
For this particular project, I chose this particular yarn brand and weight because its made from recycled water bottles. Seriously. Plus, it feels nice on the hands when working it – and when the finished piece is hanging on your arm. And, though it wasn’t my focus, I knew this purse crochet pattern would work-up fast with this thick yarn.
Regarding yarn sizing, this project can be worked with any super bulky weight yarn or similar.
What Size Is This Japanese Knot Bag?
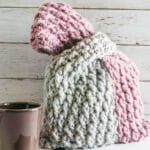
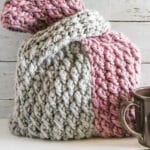
As written, this pattern is one-size. The resulting purse body is 12-inches wide by 9 inches deep, not including the handles. This is a sizable purse, but could be sized up or down by adding or reducing rows very easily.
How Much Yarn Will I Need to Make a Japanese Knot Bag?
I used about almost two full 5.29 oz skeins of 65% recycled polyester, 25% acrylic, 10% wool super bulky weight yarn (size 6) in two colorways. I do generally crochet in a medium-tension, so this is what I would consider an average amount of yarn usage for this project.
How Do You Crochet a Japanese Knot Bag?
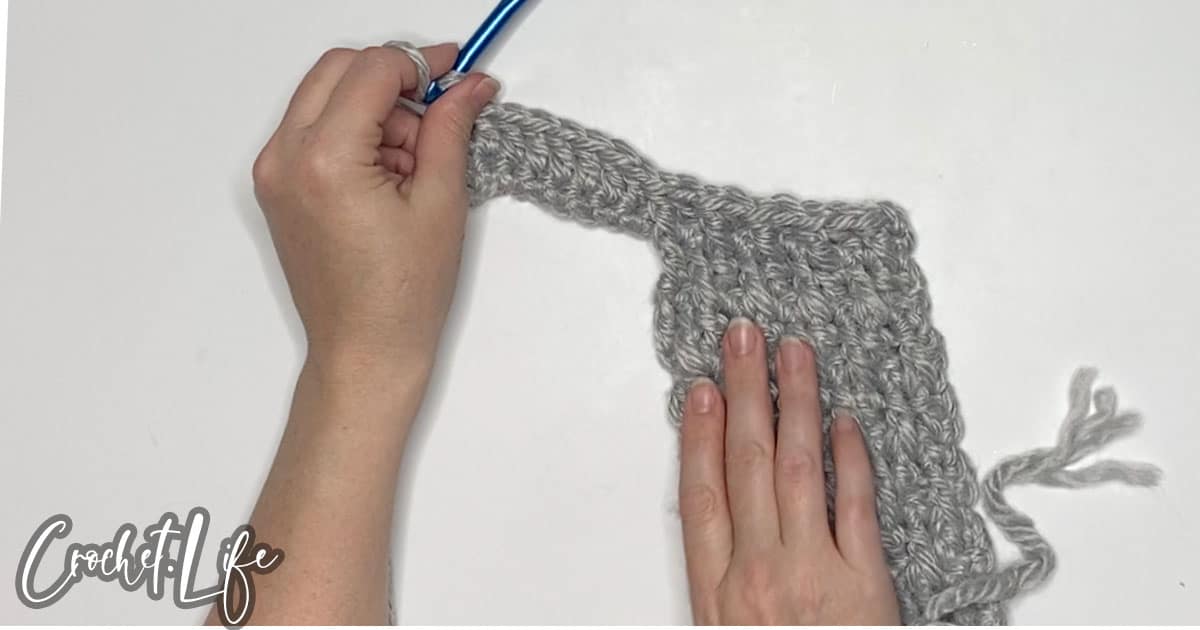
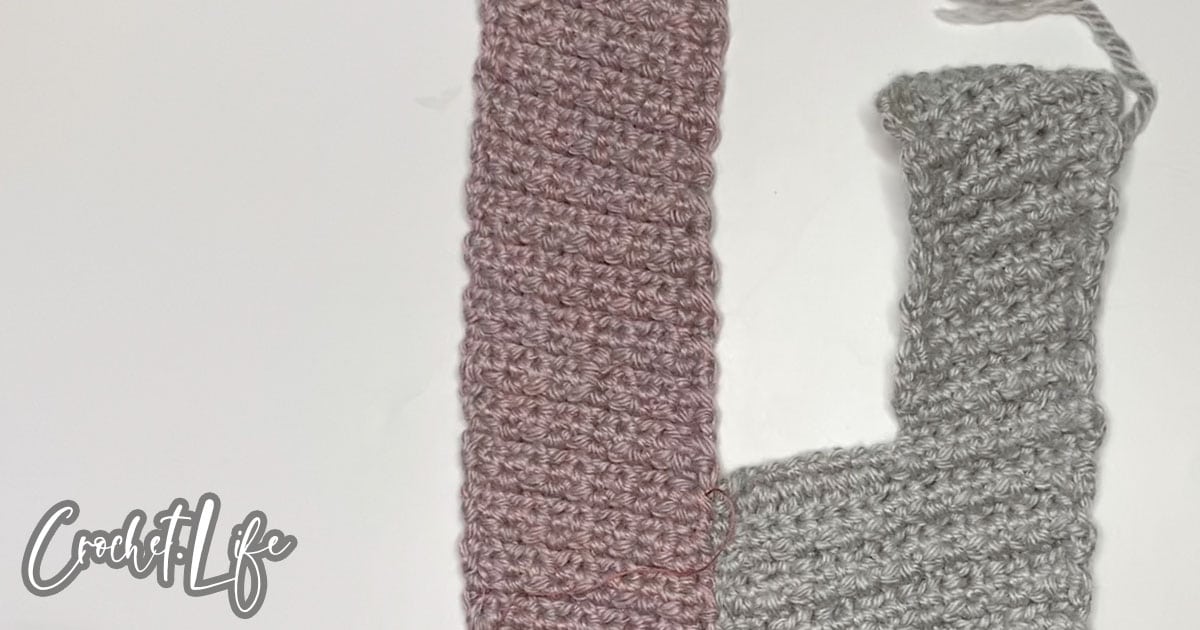
This easy purse crochet pattern is worked in two pieces, then joined before finishing. I did this specifically to allow the use of two colors, but to also simplify the shapes needed, reducing the amount of joining required during assembly.
I joined the two pieces with a mattress stitch, in an attempt to put the focus on the star of the show: the alpine stitch.
What Is The Alpine Stitch?
The alpine stitch is a combination of double crochet, front post double crochet, and single crochet, creating an alternating diamond-like texture that i just truly love. Working this piece in two elements, this adds to the texture, giving the alpine stitch an opportunity to shine in contrasting shades.
To make the alpine stitch, you build up a row of double crochet, then a row of single crochet. At this point, you work a row of alternating double crochet and the front post double crochet stitch. Add another row of single crochet, and another row of the double crochet, front post double crochet, continuing in this manner. The only real trick is to make sure that you are offsetting the second row of double crochet, front post double crochet from that first row, so that they are not aligned. That will create the dramatic diamond shape that I just love.
More Crochet Patterns
If you are interested in more great patterns, check out some of our other collections and patterns below. This list will give you tons of ideas for your next crochet project after you finish making this fun crochet headband pattern.
- Easy Pocket Shawl Crochet Pattern
- Winter View Cowl
- Stunning Textured Cowl with 4 Toggle Options
- Easy Adult-Sized Crochet Mittens
Japanese Knot Bag Crochet Pattern – Free Crochet Pattern
Below you will find the notes and directions for making this easy Japanese knot bag crochet pattern.
Size Assembled:
- 12-inches wide, 9-inches deep or 30.5cm width, 22.9cm depth
Materials
- Color A: 60 yards super bulky weight (size 6) yarn (Loops & Threads Eco-Luxe in Light Gray colorway pictured)
- Color B: 70 yards super bulky weight (size 6) yarn (Loops & Threads Eco-Luxe in Blush Blend colorway pictured)
- Pink or Grey Embroidery Thread
- Crochet hook: Size N/13 (9 mm)
- Darning Needle
Gauge:
- In double crochet, 6 stitches and 1 rows = 2.5 in x 1.5 in (6.35×3.81 cm)
Skill Level: Easy
Pattern Notes
- The yarn used for these items contains natural fiber and requires special laundering. Please read yarn labels and follow directions to maintain the life of your crochet work.
- One of the things that helped me the most when I was making this is “if there’s a DC, FPDC in it – if there’s a FPDC, then DC in it”. Keep that in mind when making this purse, or just using the Alpine Stitch in any other pattern.
Sizing
One Size
Special Stitches
Front Post Double Crochet Stitch: (FPDC)
Yarn over, insert hook from front to back to front around the post of the next double crochet stitch in the second row below (skipping the single crochet row), yarn over, pull up a loop, yarn over, pull thru 2 loops on the hook, yarn over, pull through the remaining two loops on the hook. One front post double crochet stitch (FPDC) completed.
Directions
Panel 1:
With Color A:
Chain 11.
Row 1: SC in first st from hook, SC in remaining Ch stitches. (Total 10 SC). Turn.
Row 2: Ch 1, SC in ea SC across. (Total 10 SC). Turn.
Row 3: Ch 2, DC in ea SC across. (Total 10 DC). Turn.
Row 4: Ch 1, SC in ea DC across. (Total 10 SC). Turn.
Row 5: Ch 2, *FPDC, sk next SC, DC in next SC.* Repeat from * across to second from last stitch. DC in last stitch (Total 5 FPDC – Total 11 stitches counting the starting Ch 2). Turn.
Row 6: Ch 1, SC in ea DC and FPDC (Total 10 SC). Turn.
Row 7: Ch 2, DC in next SC (above FPDC in below row), *FPDC, sk next SC, DC in next SC*. Repeat from * across to second from last stitch. DC in last stitch. (Total 4 FPDC – Total 11 stitches counting the starting Ch 2). Turn.
Rows 8 – 11: Repeat rows 4 through 7.
Rows 12 – 14: Repeat rows 4 through 6.
Row 15: Ch 2, DC in next SC (above FPDC in below row), *FPDC, sk next SC, DC in next SC*. Repeat from * across to second from last stitch. DC in last stitch. (Total 4 FPDC – Total 11 stitches counting the starting Ch 2). DO NOT TURN. Ch 10. Turn.
Row 16: SC in second st from hook, SC in ea st across (total 17 SC counting the starting ch 2). Turn.
Row 17: Ch 2, *FPDC, sk next SC, DC in next SC.* Repeat from * 4 more times. (Total 5 FPDC – Total 9 stitches counting the starting Ch 2). DC in ea remaining st (Total 8 DC). Turn.
Row 18: Ch 1, SC in ea DC and FPDC (Total 16 SC not counting the ch 1). Turn.
Row 19: Ch 2, *FPDC, sk next SC, DC in next SC*. Repeat from * across to second from last stitch. (Total 8 FPDC – Total 17 stitches counting the starting Ch 2). Turn.
Row 20: Ch 1, SC in ea DC and FPDC (Total 16 SC). Turn.
Row 21: Ch 2, DC in next SC. *FPDC, sk next SC, DC in next SC.* Repeat from * 6 more times (to second from last stitch). DC in last stitch. (Total 7 FPDC – Total 17 stitches counting the starting Ch 2). Turn.
Row 22-56: Repeat rows 18 through 21.
Row 57: Ch 1, SC in ea DC and FPDC (Total 16 SC). Fasten off. Set panel aside.
Panel 2:
With Color B:
Chain 11.
Row 1: SC in first st from hook, SC in remaining Ch stitches. Turn.
Row 2: Ch 1, SC in ea SC across. (Total 10 SC). Turn.
Row 3: Ch 3, DC in ea SC across. (Total 10 DC). Turn.
Row 4: Ch 1, SC in ea DC across. (Total 10 SC). Turn.
Row 5: Ch 2, *FPDC, sk next SC, DC in next SC.* Repeat from * across to second from last stitch. DC in last stitch (Total 5 FPDC – Total 11 stitches counting the starting Ch 2). Turn.
Row 6: Ch 1, SC in ea DC (Total 10 SC). Turn.
Row 7: Ch 2, DC in next SC (above FPDC in below row), *FPDC, sk next SC, DC in next SC*. Repeat from * across to second from last stitch. DC in last stitch. (Total 4 FPDC – Total 11 stitches counting the starting Ch 2). Turn.
Rows 8 – 76: Repeat rows 4 through 7.
Row 77: Ch 1, SC in ea DC (Total 10 SC). Fasten off.
Assembly:
Place the two panels side-by-side with Panel 1 (Grey Color A Panel) on the left side and Panel 2 (Pink Color B Panel) on the right. Align the last rows (Row 57 of Panel 1 and Row 77 of Panel 2) of the two panels.
With embroidery thread and darning needle, work back and forth in a mattress stitch (like lacing shoes) to join the two panels starting at the last rows as aligned, working through to Row 15. Tie off embroidery thread with a strong knot on each end.
Fold the joined portion of the panels in half horizontally. Align Row 15 and the last rows. With embroidery thread and darning needle, work back and forth in a mattress stitch (like lacing shoes), join the side of each panel starting at Row 15 and working down to the fold line, closing the corner tightly. Tie off embroidery thread with a strong knot on each end. Do this for each of the two sides of the purse.
Fold the long tail end of Panel 1 (Grey Color A Panel) over toward the last row and align the first row with the last row. With embroidery thread and darning needle, work back and forth in a mattress stitch (like lacing shoes), join the first row to the last row, creating a loop with the long tail end. Tie off embroidery thread with a strong knot on each end.
Fold the long tail end of Panel 2 (Pink Color B Panel) over toward the last row and align the first row with the last row. With embroidery thread and darning needle, work back and forth in a mattress stitch (like lacing shoes), join the first row to the last row, creating a loop with the long tail end. Tie off embroidery thread with a strong knot on each end.
Finishing:
Single crochet around the edges of both loops and neck of the purse.
Fasten off. Weave in ends.
Yield: 1 Japanese Knot Bag
Japanese Knot Bag Crochet Pattern
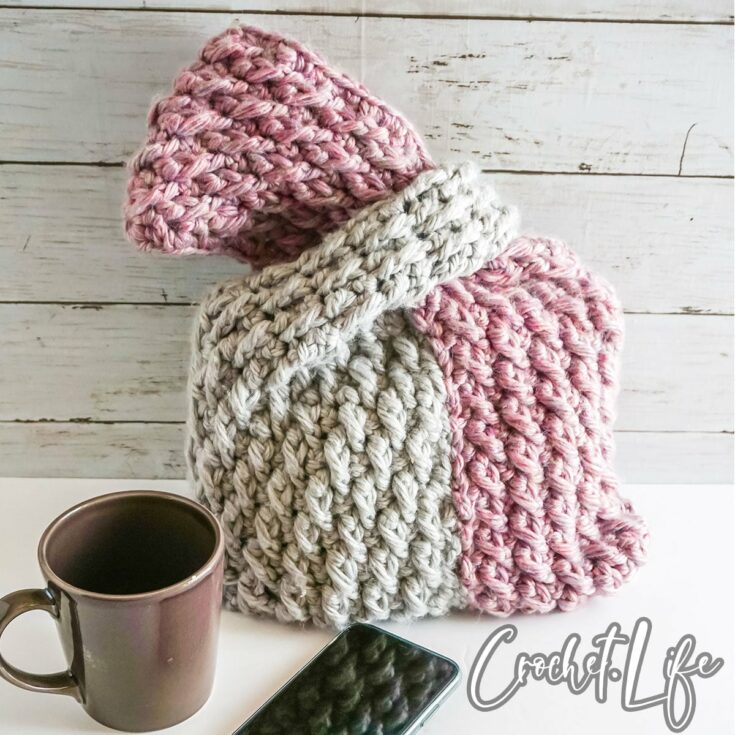
Super cute and surprisingly easy, this Japanese knot bag crochet pattern is the perfect free crochet pattern to make a gift for yourself.
2 hours
2 hours
Easy
$10
Materials
- Color A: 60 yards super bulky weight (size 6) yarn (Loops & Threads Eco-Luxe in Light Gray colorway pictured)
- Color B: 70 yards super bulky weight (size 6) yarn (Loops & Threads Eco-Luxe in Blush Blend colorway pictured)
- Pink or Grey Embroidery Thread
Tools
- Crochet hook: Size N/13 (9 mm)
- Darning Needle
Instructions
With Color A:
- Chain 11.
- Row 1: SC in first st from hook, SC in remaining ch stitches. Turn.
- Row 2: Ch 1, SC in ea SC across. (Total 10 SC). Turn.
- Row 3: Ch 3, DC in ea SC across. (Total 10 DC). Turn.
- Row 4: Ch 1, SC in ea DC across. (Total 10 SC). Turn.
- Row 5: Ch 2, *FPDC, sk next SC, DC in next SC.* Repeat from * across to second from last stitch. DC in last stitch (Total 5 FPDC – Total 11 stitches counting the starting Ch 2). Turn.
- Row 6: Ch 1, SC in ea DC and FPDC (Total 10 SC). Turn.
- Row 7: Ch 2, DC in next SC (above FPDC in below row), *FPDC, sk next SC, DC in next SC*. Repeat from * across to second from last stitch. DC in last stitch. (Total 4 FPDC – Total 11 stitches counting the starting Ch 2). Turn.
- Rows 8 – 11: Repeat rows 4 through 7.
- Rows 12 – 14: Repeat rows 4 through 6.
- Row 15: Ch 2, DC in next SC (above FPDC in below row), *FPDC, sk next SC, DC in next SC*. Repeat from * across to second from last stitch. DC in last stitch. (Total 4 FPDC – Total 11 stitches counting the starting Ch 2). DO NOT TURN. Ch 10. Turn.
- Row 16: SC in second st from hook, SC in ea st across (total 16 SC). Turn.
- Row 17: Ch 2, *FPDC, sk next SC, DC in next SC.* Repeat from * 4 more times. (Total 5 FPDC – Total 9 stitches counting the starting Ch 2). DC in ea remaining st (Total 8 DC). Turn.
- Row 18: Ch 1, SC in ea DC and FPDC (Total 16 SC). Turn.
- Row 19: Ch 2, *FPDC, sk next SC, DC in next SC*. Repeat from * across to second from last stitch. (Total 8 FPDC – Total 17 stitches counting the starting Ch 2). Turn.
- Row 20: Ch 1, SC in ea DC and FPDC (Total 16 SC). Turn.
- Row 21: Ch 2, DC in next SC. *FPDC, sk next SC, DC in next SC.* Repeat from * 6 more times (to second from last stitch). DC in last stitch. (Total 7 FPDC – Total 17 stitches counting the starting Ch 2). Turn.
- Row 22-56: Repeat rows 18 through 21.
- Row 57: Ch 1, SC in ea DC (Total 16 SC). Fasten off. Set panel aside.
With Color B:
- Chain 11.
- Row 1: SC in first st from hook, SC in remaining ch stitches. Turn.
- Row 2: Ch 1, SC in ea SC across. (Total 10 SC). Turn.
- Row 3: Ch 3, DC in ea SC across. (Total 10 DC). Turn.
- Row 4: Ch 1, SC in ea DC across. (Total 10 SC). Turn.
- Row 5: Ch 2, *FPDC, sk next SC, DC in next SC.* Repeat from * across to second from last stitch. DC in last stitch (Total 5 FPDC – Total 11 stitches counting the starting Ch 2). Turn.
- Row 6: Ch 1, SC in ea DC (Total 10 SC). Turn.
- Row 7: Ch 2, DC in next SC (above FPDC in below row), *FPDC, sk next SC, DC in next SC*. Repeat from * across to second from last stitch. DC in last stitch. (Total 4 FPDC – Total 11 stitches counting the starting Ch 2). Turn.
- Rows 8 – 76: Repeat rows 4 through 7.
- Row 77: Ch 1, SC in ea DC (Total 10 SC). Fasten off.
Assembly:
- Place the two panels side-by-side with Panel 1 (Grey Color A Panel) on the left side and Panel 2 (Pink Color B Panel) on the right. Align the last rows (Row 57 of Panel 1 and Row 77 of Panel 2) of the two panels.
- With embroidery thread and darning needle, work back and forth in a mattress stitch (like lacing shoes) to join the two panels starting at the last rows as aligned, working through to Row 15. Tie off embroidery thread with a strong knot on each end.
- Fold the joined portion of the panels in half horizontally. Align Row 15 and the last rows. With embroidery thread and darning needle, work back and forth in a mattress stitch (like lacing shoes), join the side of each panel starting at Row 15 and working down to the fold line, closing the corner tightly. Tie off embroidery thread with a strong knot on each end. Do this for each of the two sides of the purse.
- Fold the long tail end of Panel 1 (Grey Color A Panel) over toward the last row and align the first row with the last row. With embroidery thread and darning needle, work back and forth in a mattress stitch (like lacing shoes), join the first row to the last row, creating a loop with the long tail end. Tie off embroidery thread with a strong knot on each end.
- Fold the long tail end of Panel 2 (Pink Color B Panel) over toward the last row and align the first row with the last row. With embroidery thread and darning needle, work back and forth in a mattress stitch (like lacing shoes), join the first row to the last row, creating a loop with the long tail end. Tie off embroidery thread with a strong knot on each end.
Finishing:
- Single crochet around the edges of both loops and neck of the purse.
- Fasten off. Weave in ends.
Notes
Size Assembled:
- 12-inches wide, 9-inches deep or 30.5cm width, 22.9cm depth
Gauge:
- In double crochet, 6 stitches and 1 rows = 2.5 in x 1.5 in (6.35×3.81 cm)
Skill Level: Easy
Pattern Notes
- The yarn used for these items contains natural fiber and requires special laundering. Please read yarn labels and follow directions to maintain the life of your crochet work.
- One of the things that helped me the most when I was making this is “if there’s a DC, FPDC in it – if there’s a FPDC, then DC in it”. Keep that in mind when making this purse, or just using the Alpine Stitch in any other pattern.
Sizing
One Size
Special Stitches
Front Post Double Crochet Stitch: (FPDC): Yarn over, insert hook from front to back to front around the post of the next double crochet stitch in the second row below (skipping the single crochet row), yarn over, pull up a loop, yarn over, pull thru 2 loops on the hook, yarn over, pull through the remaining two loops on the hook. One front post double crochet stitch (FPDC) completed.
Recommended Products
As an Amazon Associate and member of other affiliate programs, I earn from qualifying purchases.
Christina Marie says
Love this version of the Japanese knot bag more than any one that I’ve seen. However ive started this pattern over and over. Im having so many issues. I usually don’t have a count issue and that’s what I’ve been having lot of… the repeats seem to be ending on double crochets in the pattern but it won’t have the same amount for front post double crochets as it’s not doing the repeats from start to finish. When you say to start in the first double crochet after a chain I get the count wrong if I start in the first one or if I start in the second one… So I’m not sure if you want me to skip the first space. It seems to me like you have it all laid out really nicely but I’m just not following. When you say skip first double crochet I’m always confused and whether or not you mean the one on the very end or the next one. Or if it’s a skip single crochet… I want to blame myself for this issue but I have tried it over and over and I just can’t seem to grasp it and I have crocheted some complex things just fine. I was following it exactly as you said it but that was when I would have the stitch count wrong. So sorry for my novel here I just really want to do this.
Chantal Kirkland says
Hi, Christina!
Thank you for giving this a shot. I’m sorry you’re having trouble with it. I am editing the pattern soon. It is a complex stitch, so I know that it can be difficult. One of the things that helped me the most when I was making this is “if there’s a DC, FPDC in it – if there’s a FPDC, then DC in it”. Also, I think the pattern is tough too because, in an effort to be as clear as possible, I didn’t provide stitch counts, I provided counts for FPDC’s which is different. So, I’m updating it. Look for that in the next day or two.
Hana says
Hello. I am having the same issue as well as above comment. The stitch count won’t match if following the instruction. E.g. Panel 1
R4: 10Sc
R5: Total 5Fpdc and 4Dc — I skip the first sc that is the sc that is right below where I make the beginning Ch2. (If I don’t skip, it will be 5Fpdc and 5Dc, so 10 stitches. But it means it won’t match with the instruction’s total stitches for R6 which is 9 stitches.)
R6: 9Sc — matches with instruction, so I assume what I did for R5 is correct.
R7: Total 4Fpdc and 5Dc
R8: 9Sc — matches with instruction, so I assume what I did for R7 is correct.
R12: 8Sc — Reduced by 1 stitch, as R4 (10Sc), reduced to R5 (9Sc)
R14: 7Sc
R15: TOTAL 3FPDC and 4Dc + 10 ch. [Total 17 stitches]– Instead of 4Pfdc and 3Dc + 10Ch.
R16: 16 Sc — matches with instruction, so I assume what I did for R15 is correct.
R17: Total 4Fpdc, 3 Dc and 8 Dc onwards
R18: 15Sc. — Doesn’t match with total stitches in instruction that is supposed to be 16 stitches.
If from R5, I am not skipping the first sc, it will be 10 stitches, until R14 and R15. R16 will be 20 stitches, which is too much.
Please let us know where I did wrong. It’s a very lovely pattern that I wished to be able to do. Thank you very much.
Chantal Kirkland says
Hi, Hana!
You are very right, this is a complex pattern and despite me trying my hardest to explain, this is the same problem I ran into when writing the pattern, trying to depict what I had to do to make the bag. I am going to edit the pattern, but you are on the right track. When I was trying (very hard, because this isn’t your usual pattern, obviously) to explain, what I should have said on Row 5 for example, was: “Ch2 (counts as 1st DC), *FPDC…Total 11 stitches (last 2 stitches should be FPDC, DC in that order).” I’m sorry to have caused you frustration. Look for the updated pattern in the next day or two.
Joelle says
It is the Row 6 that causes the confusion. Row 4 has 10sc and Row 6 has 9sc. Are ww skipping the last dc when we begin the new row of sc so that we have 9sc or do we put a sc in each dc so that we have 10sc? I have stuck with skipping the last dc and doing 9sc and when I come back around, I place the last dc in that turning ch/skipped sc area.
Chantal Kirkland says
Hi, Joelle! Thank you for giving this pattern a try. I really appreciate the feedback. I have updated the pattern – with an eye to the feedback you provided. I further explained the stitch counts and what I’m actually doing…I also added a video. So, hopefully that helps.
Dalma says
Dear Karla,
Thank you for this lovely pattern, however, I’m having the same issue as mentioned above…. I’ve been trying to make this for 1000 times, but it just doesn’t seem to add up. I have even watched the video many times and as I pause it and count the stitches and chains, you don’t have the same amount as you describe it. When you write 10 stitches, in the video you somehow have 8. I am dying to make this bag because it’s wonderful and I truly appreciate that you share it with us, but even the updated version is still fuzzy. For example here:
Row 15: Ch 2, DC in next SC (above FPDC in below row), *FPDC, sk next SC, DC in next SC*. Repeat from * across to second from last stitch. DC in last stitch. (Total 4 FPDC – Total 11 stitches counting the starting Ch 2). DO NOT TURN. Ch 10. Turn.
Row 16: SC in second st from hook, SC in ea st across (total 16 SC). Turn.
If in row 15 I have 11 stitches and then I add 10 chains and then SC throughout, how come that the result will be 16 SC? It should be at least 18 (not counting the starting Ch2), but then the pattern does not work. Please help!
Cheers,
Dalma
Chantal Kirkland says
Hi, Dalma. I have made and remade this pattern and I’m so sorry you’re still struggling with it – it’s so complex, and I’m struggling (obviously) to make it easy enough to understand for everyone. I tried to adjust it today to contemplate where I think the miscommunication is. In row 16, you have to skip the first 2 ch for your turning (you start the sc in the second chain from the hook), then sc across, which leaves you with 17 sc, if you count the turning ch as a sc. I hope that helps.
Janice says
i just want to start by saying i love this bag!!! I was so excited to start it but i’m having alot of trouble…i’m getting very confused on row 15. when i chain 10 and then sc across i don’t get 16 stitches. when i follow the pattern i get 18. i took the whole thing apart and started over and tried to skip stitches to get the right number but something just doesn’t look right. also row 17 and 19 both start with a FPDC which wouldn’t stagger the stitch. i switched them but then it doesn’t have me making 8 FPDC and then 7 FPDC. both rows give me 8 so i’m not sure what i’m doing wrong. i tried to watch the video but it wasn’t very clear quality to see. thank you so much for giving us this pattern i really appreciate it! i just want to make it right and know i’m doing something wrong 🙁