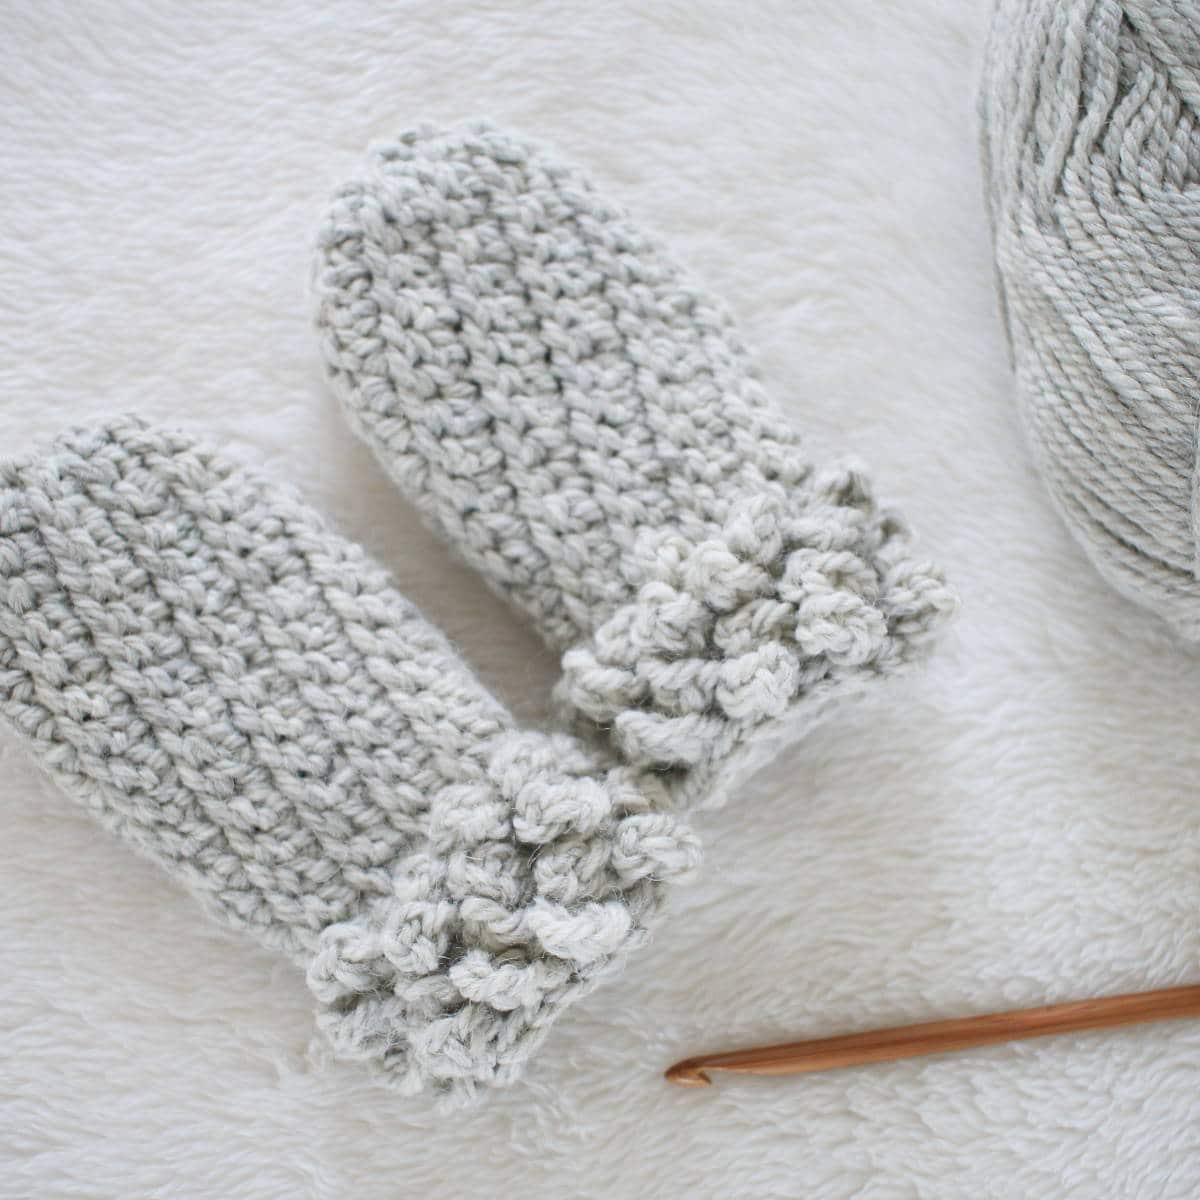
These easy crochet thumbless mittens for toddlers are a little bit genius. They’re perfect for kids that don’t quite get fingers in gloves–but love being out in the cold!
I didn’t make mittens for my children when they were babies or even small toddlers. I was enthralled with making blanket designs at that time. But when I started working on crochet mitten designs I remembered the frustration with those adorable little thumbs. Every-time-with-the-thumb!
Me: Anybody want to go play in the snow?
Kids: Yayyyyyyy!
Me: Ok, let’s go get your stuff!
(Minimum 20 minutes later) Me: Wait just a second sweetie, don’t go out the door, I need to get your brother finished up. Where are your mittens? Oh, no wait, that’s backward. Push your hand in. Oops we missed, let’s try again. Ok, now push your hand in, make sure you put your thumb right here. I know it’s a little crooked, but it will straighten our while you play. Now let’s get the other one on…
With these Mama memories in mind, I design my baby and toddler mittens thumbless.
But I keep wondering whenever I think about my super independent little guy, would he have put up with a thumbless mitten? Or, would he have found a hole in the stitches and made his own thumb hole? I have my suspicions.
What are your thoughts? Let me know your opinion in the comments section below.
The matching Winter Spun pattern is also available for bigger kids and adults.
The full free pattern is provided below including all sizes, materials, and notes. An ad-free PDF version of the Winter Spun Mittens pattern is also available for you to purchase, download, and print out.
More pattern information below!
What You Need to Make These Easy Crochet Thumbless Mittens for Toddlers
Materials:
- Solid color – per mitten, approximately 60 yards worsted or aran weight yarn. Drops Nepal, wool and alpaca blend, used for mittens pictured.
- With accent cuff – per mitten, approximately 32 yards base/28 yards accent color/worsted or aran weight yarn. Drops Nepal, wool and alpaca blend, used for mittens pictured.
- Crochet hook: Size I/9 (5.5 mm) or size needed to obtain gauge
- Open ring stitch marker or small length of yarn (approximately 12 inches) to mark rounds
- Tapestry needle
Gauge:
Mini picot single crochet/slip stitch pattern, worked in the round, 8 stitches and 8 rows = 2 inches
Skill Level: Easy/Intermediate
Mitten Sizes:
-
Toddler (thumbless): approximately 5.5 in. long x 2.75 in. wide at fingers (14 x 7 cm)
-
Child: approximately 7 in. long x 3.25 in. wide at fingers (18 x 8 cm) – Free Child’s Version Here
-
Teen/Adult X-Small: approximately 8.5 inches long x 3.75 in. wide at fingers (21 x 9 cm) – Free Teen Version Here
-
Adult Small/Medium: approximately 9.25 in. long x 4 in. wide at fingers (23 x 10 cm) – Free Adult Version Here
Pattern Notes
Please take time to create a gauge sample and get appropriate hand measurements before beginning work.
These mittens are worked in a continuous spiral. Do not join rounds unless indicated.
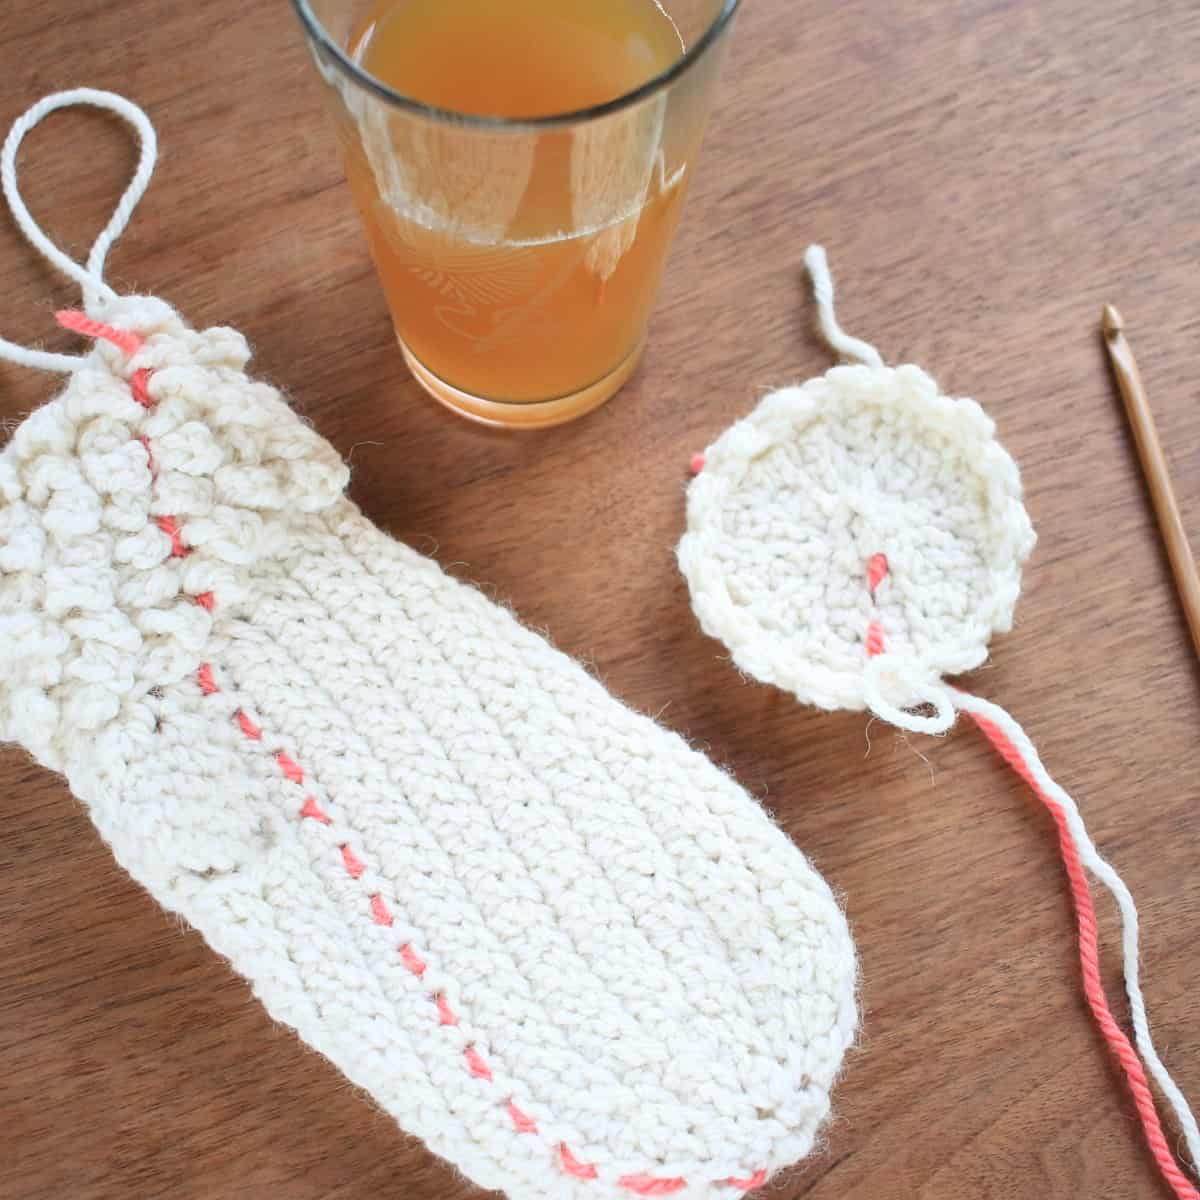
A small length of contrasting yarn may be used in place of a stitch marker. Weave the yarn upwards as you work rounds in the piece. See stitch marker picture below.
The yarn used for these mittens contains natural fiber and requires special laundering. Please read yarn labels and follow directions to maintain the life of your crochet work.
Special Stitches
This pattern uses picot stitches with 1 – 5 chains as part of each stitch. Worked in the round, I love seeing the visual difference of a chain 1 picot to a chain 4 or 5. The stitches look worlds apart. If you are new to putting picot stitches within your pattern, not just using them as a border, don’t worry. You will have plenty of time to get used to creating this picot stitch combination with a chain 1 before you start adding multiple chains to each stitch to create the texture for this mitten cuff.
Single Crochet Two Together:
Insert hook into stitch, yarn over and pull through stitch, insert hook into next stitch of row, yarn over and pull through stitch (three stitches on hook), yarn over and pull through all three stitches on hook.
Mini Picot Single Crochet:
Insert hook into stitch, yarn over and pull up a loop, chain 1 (as in – yarn over and pull up a loop), yarn over and pull through both loops on hook.
Chain 3 Picot Single Crochet:
Insert hook into stitch, yarn over and pull up a loop, chain 3 (as in – yarn over and pull up a loop), yarn over and pull through both loops on hook.
Chain 4 Picot Single Crochet:
Insert hook into stitch, yarn over and pull up a loop, chain 4 (as in – yarn over and pull up a loop), yarn over and pull through both loops on hook.
Chain 5 Picot Single Crochet:
Insert hook into stitch, yarn over and pull up a loop, chain 5 (as in – yarn over and pull up a loop), yarn over and pull through both loops on hook.
How to Make These Easy Crochet Thumbless Mittens for Toddlers
(Make 2 as the pattern is the same for right and left.)
Chain 5, slip stitch to join.
Round 1:
Two single crochet into back loop of each stitch of starting chain. (10 stitches total)
Place stitch marker or begin to use a length of yarn to mark rounds. (See Stitch Marker picture below.) Move marker up or weave yarn up for each round forward.
Round 2:
*In both loops of first stitch of round, Mini Picot Single Crochet (see Special Stitches Section) and slip stitch, repeat from * for each stitch of round. (20)
Rounds 3 – 12:
*Mini picot single crochet into first stitch of round, slip stitch into second stitch of round, repeat from * for remainder of round. (20)
Round 13:
*Mini picot single crochet into first stitch of round, slip stitch into second stitch of round, repeat from * for remainder of round until last 2 stitches, single crochet last 2 stitches together (see Special Stitches Section). (19)
Round 14:
*Mini picot single crochet into first stitch of round, slip stitch into second stitch of round, repeat from * for remainder of round until last 2 stitches, single crochet last 2 stitches together. (18)
Round 15:
*Mini picot single crochet into first stitch of round, slip stitch into second stitch of round, repeat from * for remainder of round until last 2 stitches, single crochet last 2 stitches together. (17)
Round 16:
*Mini picot single crochet into first stitch of round, slip stitch into second stitch of round, repeat from * for remainder of round until last 2 stitches, single crochet last 2 stitches together. (16)
Round 17: Optional color change for cuff
*Slip stitch in back loop of first stitch of round, Chain 3 Picot Single Crochet (see Special Stitches Section) in front loop, skip one stitch, slip stitch in back loop of next stitch of round, Chain 4 Picot Single Crochet (see Special Stitches Section) in front loop, skip one stitch, repeat from * for remainder of round.
Round 18:
*Slip stitch in back loop of first stitch of round, Chain 5 Picot Single Crochet (see Special Stitches Section) in front loop, skip one stitch, repeat from * for remainder of round.
Rounds 19 and 20:
Repeat Rounds 17 and 18 once.
Round 21:
Slip stitch in each stitch of round. (16)
Fasten off.
Weave in ends.
Optional – Yarn used in place of stitch marker:
A small length of contrasting yarn may be used in place of a stitch marker. Weave the yarn upwards as you work rounds in the piece.
Add Winter Spun Mittens to your Ravelry Favorites.
Like this pattern? Share more photos on Pinterest.
Easy Crochet Thumbless Mittens for Toddlers
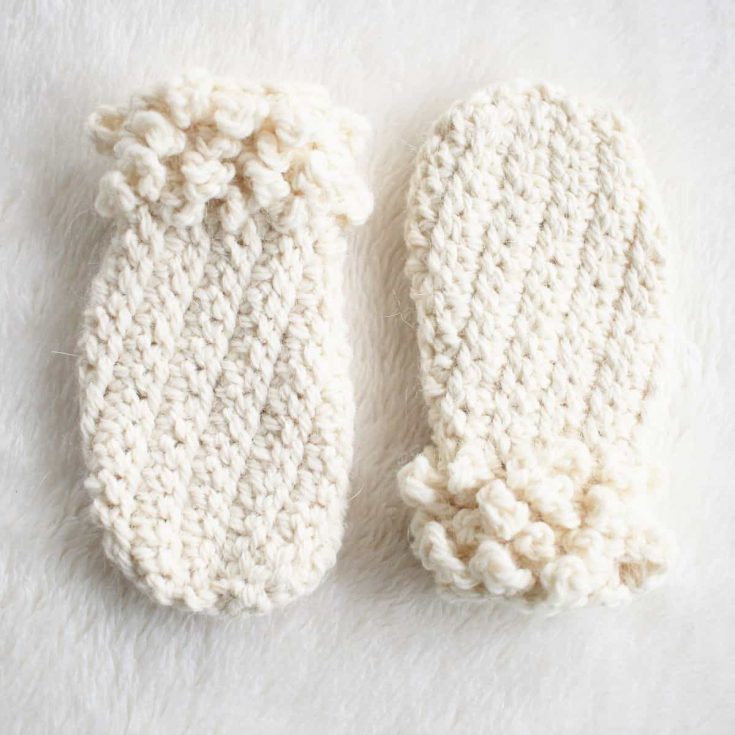
How fun are these easy crochet thumbless mittens for toddlers?! They're perfect for those kids who love gloves, but don't quite have the knack of getting their thumbs in the right place.
Materials
- Solid color - per mitten, approximately 60 yards worsted or aran weight yarn. Drops Nepal, wool and alpaca blend, used for mittens pictured.
- With accent cuff - per mitten, approximately 32 yards base/28 yards accent color/worsted or aran weight yarn. Drops Nepal, wool and alpaca blend, used for mittens pictured.
Tools
- Crochet hook: Size I/9 (5.5 mm) or size needed to obtain gauge
- Open ring stitch marker or small length of yarn (approximately 12 inches) to mark rounds
- Tapestry needle
Instructions
- (Make 2 as the pattern is the same for right and left.)
- Chain 5, slip stitch to join.
- Round 1: Two single crochet into back loop of each stitch of starting chain. (10 stitches total)
- Place stitch marker or begin to use a length of yarn to mark rounds. (See Stitch Marker picture below.) Move marker up or weave yarn up for each round forward.
- Round 2: *In both loops of first stitch of round, Mini Picot Single Crochet (see Special Stitches Section) and slip stitch, repeat from * for each stitch of round. (20)
- Rounds 3 - 12: *Mini picot single crochet into first stitch of round, slip stitch into second stitch of round, repeat from * for remainder of round. (20)
- Round 13: *Mini picot single crochet into first stitch of round, slip stitch into second stitch of round, repeat from * for remainder of round until last 2 stitches, single crochet last 2 stitches together (see Special Stitches Section). (19)
- Round 14: *Mini picot single crochet into first stitch of round, slip stitch into second stitch of round, repeat from * for remainder of round until last 2 stitches, single crochet last 2 stitches together. (18)
- Round 15: *Mini picot single crochet into first stitch of round, slip stitch into second stitch of round, repeat from * for remainder of round until last 2 stitches, single crochet last 2 stitches together. (17)
- Round 16: *Mini picot single crochet into first stitch of round, slip stitch into second stitch of round, repeat from * for remainder of round until last 2 stitches, single crochet last 2 stitches together. (16)
- Round 17: Optional color change for cuff: *Slip stitch in back loop of first stitch of round, Chain 3 Picot Single Crochet (see Special Stitches Section) in front loop, skip one stitch, slip stitch in back loop of next stitch of round, Chain 4 Picot Single Crochet (see Special Stitches Section) in front loop, skip one stitch, repeat from * for remainder of round.
- Round 18: *Slip stitch in back loop of first stitch of round, Chain 5 Picot Single Crochet (see Special Stitches Section) in front loop, skip one stitch, repeat from * for remainder of round.
- Rounds 19 and 20: Repeat Rounds 17 and 18 once.
- Round 21: Slip stitch in each stitch of round. (16)
- Fasten off.
- Weave in ends.
Notes
Gauge: Mini picot single crochet/slip stitch pattern, worked in the round, 8 stitches and 8 rows = 2 inches
Skill Level: Easy/Intermediate
Mitten Sizes:
- Toddler (thumbless): approximately 5.5 in. long x 2.75 in. wide at fingers (14 x 7 cm)
- Child: approximately 7 in. long x 3.25 in. wide at fingers (18 x 8 cm) - Free Child's Version Here
- Teen/Adult X-Small: approximately 8.5 inches long x 3.75 in. wide at fingers (21 x 9 cm) - Free Teen Version Here
- Adult Small/Medium: approximately 9.25 in. long x 4 in. wide at fingers (23 x 10 cm) - Free Adult Version Here
Pattern Notes
Please take time to create a gauge sample and get appropriate hand measurements before beginning work.
These mittens are worked in a continuous spiral. Do not join rounds unless indicated.
A small length of contrasting yarn may be used in place of a stitch marker. Weave the yarn upwards as you work rounds in the piece. See stitch marker picture below.
The yarn used for these mittens contains natural fiber and requires special laundering. Please read yarn labels and follow directions to maintain the life of your crochet work.
Special Stitches
This pattern uses picot stitches with 1 - 5 chains as part of each stitch. Worked in the round, I love seeing the visual difference of a chain 1 picot to a chain 4 or 5. The stitches look worlds apart. If you are new to putting picot stitches within your pattern, not just using them as a border, don't worry. You will have plenty of time to get used to creating this picot stitch combination with a chain 1 before you start adding multiple chains to each stitch to create the texture for this mitten cuff.
Single Crochet Two Together:
Insert hook into stitch, yarn over and pull through stitch, insert hook into next stitch of row, yarn over and pull through stitch (three stitches on hook), yarn over and pull through all three stitches on hook.
Mini Picot Single Crochet:
Insert hook into stitch, yarn over and pull up a loop, chain 1 (as in - yarn over and pull up a loop), yarn over and pull through both loops on hook.
Chain 3 Picot Single Crochet:
Insert hook into stitch, yarn over and pull up a loop, chain 3 (as in - yarn over and pull up a loop), yarn over and pull through both loops on hook.
Chain 4 Picot Single Crochet:
Insert hook into stitch, yarn over and pull up a loop, chain 4 (as in - yarn over and pull up a loop), yarn over and pull through both loops on hook.
Chain 5 Picot Single Crochet:
Insert hook into stitch, yarn over and pull up a loop, chain 5 (as in - yarn over and pull up a loop), yarn over and pull through both loops on hook.

newbie says
Hi! Do you have a YouTube channel where you show beginners how to make these patterns?
Linda says
I would also be interested in 5his. The stitcuage works out but the rows are way more than 8.